Tuesday, October 19, 2010
I moved
I made a big move.. huge as a matter a fact . Im very happy that I relocated to New york City!! the lights the sounds its amazing . Though Im originally from here but I have been living in the country to its a shock almost again lol Now i can't be having culture shock this often ! im very happy to have done this Now all i need is a job and my own place. Meaning by myself mom No cats ! lol
Wednesday, August 18, 2010
Elf mineral face primer: A review
So i got this primer about 4 months ago and wanted to give it a try before i reviewed this product. Now i have to say the only other primer i have ever used was the rimmel fix and perfect. The look, feel and color of both of these are completely different. The Elf primers appearance reminds me of smashbox photoready primer.Its a transparent gel. On the elf website this product claims are as follow" Transform your face into a flawless and smooth canvas with the Mineral Infused Face Primer. Developed to combat against excess oil, flaky dryness, enlarged pores and fine lines. This clear multipurpose skin primer will prepare your skin so makeup goes on evenly for a long lasting satin finish."
Now what i found with this primer is texture feels oily after it dried it left my skin feeling smooth to the touch.I found applying liquid products easier with the primer on. I have also apply mineral foundation over this primer i quite like it makes my foundation whether its liquid or powder stay on longer . Its really good at that. Recently i have been breaking out bad ,,, like really bad but around the time i started this primer i also changed my moisturizer .. olay You suck. I don't think it was the primer but i will be switching back to my old moisturizer and blog back on my find But other than that this primer rocks i really like it . Now the packaging is another story...kinda . I like it but...the pump man its hard to control one full pump is way to much but i've mastered controlling the pump but in the beginning i wasted so much product, but for the price $6 usd wasn't so bad the inside is what matters ^_^
Sunday, July 25, 2010
Tuesday, June 22, 2010
A Day At the beach: a collection review from sudsnsass
Hey guys .well do i have a treat for you. Elizabeth owner of sudsnsass.com had asked me on twitter if i wanted to try this new collection she was releasing. and of course I said yes . The collection was released 6/21/2010. This collection consist of 15 shadows 2 bronzers 2 blusher and 2 highlighters . This collection is named A Day At The Beach. Now I must say that these shadows are freaking amazing I have a couple of favorites .they are so pigmented and easy to blend but be weary with any loose powder eyeshadow is better applied in a patting manner or you will get fall out. So the eyeshadows are pigmented and easy to blend . The eyeshadows don't all have the same finish some are shimmery which i love some are matte some are satin .the looks that can be created with this collection are countless .
1.Tidal wave is a darkened teal this color is great for the crease ,outer v, and the lid (My fave)
2.Flip Flops is a dark yellow green color more green than yellow tho beautiful color for anywhere on the eye
3. Surfs up light blue color with some greenish hints to it pretty lid color
4. Poolside is an awesome lightblue bomb ass lid color yo
5.Seagrass is a yellowgreen looks great with brown eyes
6.Beach Babe its a brown with red/gold undertones good for a neutral eye with a kick
7.Sunburn is a pretty rusty brownish Orange red color i like it for a smokey eye
8.SummerTime is gold/yellow its amazing for a lid color cheek highlight & inner corner highlight
9.polkadot bikini an orange/coral color look good on the lid with a chocolatebrown in the crease
10. Boardwalk is a copper color looks amazing applied wet very shabam.
11.Piercing Parlor is a silvery gray looks metallic almost it shows up metallic if applied wet this color is perfect for a dark smokey eye (FAVE)
12. beach sand a beige eyeshadow great for inner corner, brow bone and lid its my skin color so i use it for blending out color
13.Sand castle a pearl white-ish color perfect for highlight anywhere on eye or face
14 Tattoo Shop a purple with a black base it has awesome blue glitters omg this is a must have (FAVE)
15.Banana taffy is a vibrant yellow my mom had borrowed it so it has its own shot its pretty i like it
My secret obsession is blusher and bronzers but I also have my favorite within this beautiful and colorful collection
Blushers
Blushers
1 cotton candy its a beautiful color but doesn't suite my coloring its more for more porcelain skin tones i tried as a lipgloss color mixing it with clear and it look amazing
2.raspberry snow cone is beautiful i love it on my skin it would look nice on darker skin as well
Bronzers
1.suntan is the lighter of the two and i love it as blush it makes me look so sunkissed (FAVE)
2,bronzed goddess is perfect for contouring i proclaim it a fave as well
Highlighers
1Pink horizons is love looks great on all skin tones
2 golden rays is also love looks great on all skin tones especially dark.
further more I think that these shadows are great quality very well pigmented and elizabeth packages her stuff very well she has great costumer service I've purchased many of times from her she is very personable with all of her costumers
http://www.suds-n-sass.com
For 15% off on purchases on any order $10 usd or more with promo code: lydiache. she also has june buy more save more for volumes purchases check webpage for details
 |  |
| |
| |
| |
Sunday, June 20, 2010
Suds-nsass: a day at the beach(Arabian waves)
omg im in love with this line
its being released 6/21/2010 use promo code lydiache for 15% off good thru 7/2010 a review will be up shortly.
Saturday, June 12, 2010
Suds-n-Sass bronze look
Firstly start off with a clean face .
Toner and moisturizer.
Apply face primer to face and foundation. I'm using bareminerals matte in fairly medium. concealer is an option prior to powder I don;t really like it so i don't use it..
1.I contoured my face with bronzer I used Rimmel bronzer in sunlight.
2.As my blusher I used Suds-n-sass blusher in peachykeen. Its really pretty.
3.Highlight high points of the face with suds-n-sass eyeshadow in Ice Queen. with this e/s you need a very small amount it is high shimma!
Now the eyes
1.Apply urban decay primer potion to the lids .
2.after the primer apply a cream base i used revlon cream e/s in seashells the first one of the four.
3.Now with a small smudge brush apply twinkle e/s to the inner corners
4.next with a shader brush pat on Pharoh e/s i build the color up not going past the crease area.
5.In the crease with a blending brush apply Champagne e/s blending out Pharoh at the crease.
6.With a pencil brush work Brown sugar e/s to the outer V
7.Then blend to soften any harsh edges .
8.Apply brow highlight I used Ice queen again.
I also filled in my eyebrows to make them darker .
The lips
1.Nivea kiss of moister
2.nyx round lipstick in Paris
3 apply Suds-n-sass e/s to the middle of bottom lip in blossom I blended this out with my finger
Thursday, June 10, 2010
Tuesday, March 16, 2010
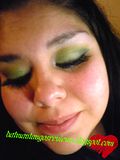
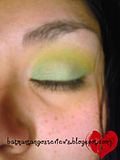
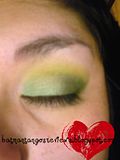
Spring eyeshadow look greens and blue
I love this look Sadly my allergies had my eyes all watery ... yea .
ok so here we go this is the look we are going for
The first thing you want to do is apply your primer . I used urban decay primer potion .. say that 3 times fast then on top of that apply nyx jumbo pencil in milk
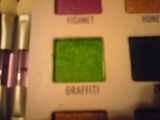
With a small shading brush apply urban decay eyeshadow in graffiti
 <
<
like so
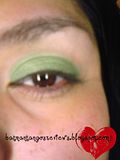
OK now grab your favorite crease brush and your 88 matte pallette
and apply those colors along the crease
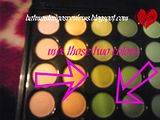
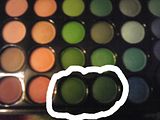
Now to the outer V apply the two dark greens from your 88 pallet
To the bottom lash line apply a true blue liner , and the inner corner apply some nxy milk to highlight then snudge with your finger
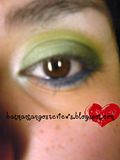
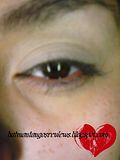
Apply urban decay shadow in peace with a liner brush
like so
also apply a highlight color in you inner corner and brow bone i used Elf eyeshadow in sand dollar
Finally add liner and mascara I line my upper lash line with loreal hip color chrome eyeliner in Back shock and smudge it with liner brush for mascara I used my favorite Eyeko big eyes mascara

and that was it
Products used
1. urban decay primer poition
2.nyx jumbo pencil in milk
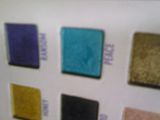
3.urban decay deluxe palette ( e/s graffiti ,e/s peace)
4.ebay 88 matte pallete (green 1 &2 first green 3rd row across 3rd one down and second green 3rd row across 4th one down mixed with the first one.... crease color)
outer v 88 matte palette the two dark greens
4 Elf single eyeshadow in sand dollar
5 eyeko line and shine electric blue
5 loreal hip color chrome eyeliner pencil in black shock
6 eyeko mascara big eye
Brushes needed
1 small shader brush
2 crease brush
3 pencil brush
4 liner brusg
5 large shader brush
6 blending brush
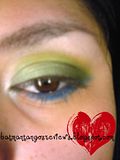
ok so here we go this is the look we are going for

The first thing you want to do is apply your primer . I used urban decay primer potion .. say that 3 times fast then on top of that apply nyx jumbo pencil in milk

With a small shading brush apply urban decay eyeshadow in graffiti
 <
<like so

OK now grab your favorite crease brush and your 88 matte pallette

and apply those colors along the crease

Now to the outer V apply the two dark greens from your 88 pallet


To the bottom lash line apply a true blue liner , and the inner corner apply some nxy milk to highlight then snudge with your finger

Apply urban decay shadow in peace with a liner brush

like so

also apply a highlight color in you inner corner and brow bone i used Elf eyeshadow in sand dollar
Finally add liner and mascara I line my upper lash line with loreal hip color chrome eyeliner in Back shock and smudge it with liner brush for mascara I used my favorite Eyeko big eyes mascara

and that was it
Products used
1. urban decay primer poition
2.nyx jumbo pencil in milk
3.urban decay deluxe palette ( e/s graffiti ,e/s peace)
4.ebay 88 matte pallete (green 1 &2 first green 3rd row across 3rd one down and second green 3rd row across 4th one down mixed with the first one.... crease color)
outer v 88 matte palette the two dark greens
4 Elf single eyeshadow in sand dollar
5 eyeko line and shine electric blue
5 loreal hip color chrome eyeliner pencil in black shock
6 eyeko mascara big eye
Brushes needed
1 small shader brush
2 crease brush
3 pencil brush
4 liner brusg
5 large shader brush
6 blending brush
Sunday, January 10, 2010
Primers and why are they so important
Do you guys remember when you were younger and would take your mom make-up, or you went through that punk rock phase and all that black eyeshadow or liner creased?? Pretty huh? ..No I didn't think so either. It was about a year ago when I started to really to get back into make-up I had stopped wearing it because my sponge tips didn't make my eyeshadow look like it did on Gerad Way from My chemical romance .. ah the black and the red eyeshadow. Now I'm not bashing sponge tips I just didn't know how to utilize them. I learned everything pretty much from youtube watching gurus. The various Gurus would talk about udpp Urban decay primer potion, too faced shadow insurance, Loreal decrease , and Mac paint pots . Now I didn't know which one was the better one so I researched all of these primers . My first primer was loreal decrease I did like what it did for my wash of color it made the color pop and stay on longer .Then I got curious on other primers but udpp and tfsi was 17 each and I wasn't willing to spend that much for a while I was quite content with my loreal.. then I went off from my safety zone Champagne colored eyeshadow and tried light pinks and adding contour then after that I was hooked . Eventually I ventured out and bought udpp the big tube I had used a coupon and was pretty content with what I had paid . Udpp Changed everything ! After One use I had an Epiphany . I realized how much more pigmented my drug store eye shadows looked , how much less product I used .Now choosing a primer . If you have oily lids dry lids its what depends on what primer you choose I have dry lids but I use udpp and a base over that to get some sort of moisture . But either way I love udpp . other recent primer i've tried out is the elf eyelid primer . This Primer is awesome its very similar to udpp smooth application and evens out the skin tone but what makes the elf eyelid primer better is the price which is $1 and its amazing . If your on a budget the elf one is the one to pick makes the colors pop and prevents creasing for about 8+ hours but do take into account I work indoors with airconditioning so this may extend the wear .
www.urbandecay.com for urban decay primer potion
www.eyelipsface.com for elf eye lid primer
www.urbandecay.com for urban decay primer potion
www.eyelipsface.com for elf eye lid primer
Subscribe to:
Posts (Atom)